
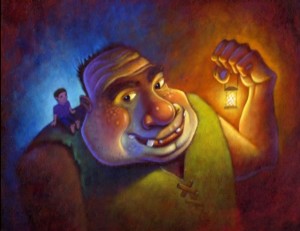
An old Painting I Did For Fun
A little lesson in acrylics but watch fast because it goes fast.
The worst (and best) thing about painting with acrylics
The worst thing about painting in acrylics is that it dries fast. The best thing about painting in acrylics is that it dries fast. The worst thing about painting in acrylics for me while doing THIS painting was filming it and working around the camera.
Notice the painting process, Start with the Darks
As you can see, or could see, or did see, if you actually watched the video, I first tone the canvas, (AKA gessoed board in this case) with a dark yet rich color. Then I paint in a little more dark, and you will note that the dark acrylic colors are transparent, while the lighter colors, (aka colours) are opaque. And that is a good thing, so you can see you lines, a little, and transparent shadows are nice. Plus it is good to cover up what you want with those light colors.
Slowly build it up with lighter and lighter paint
Then I paint lighter and lighter colours, I mean colors, to model the painting, giving it form and sculpting it out. WARNING! You can’t be in too big of a hurry to get to the lightest colors though. You want to, and I want you to, gradually bring your painting to life. It took me longer to paint this than it took you to watch it believe me.
Use the same color of paint in more than one place for unity
When I have a good color mixed I will paint more than just one area too. So the yellow color around the lantern, I also use on the vest and in the flesh and background as well. This is not just to save time and effort, it also ties the picture together and gives it a sense of good color balance and unity. We don’t want it to look like a collage of cut outs with contrasting colors that don’t work together.
I am not afraid to go back in with some darks to define areas as well. Like the lines on the lantern, the eyes and around the teeth. It is good to have a few good crisp lines contrasted with some nice soft edges.
Warm Light and Cool Shadows
Although it is not a hard fast rule, I like to use warm lights and cool shadows. If I paint cool lights I like to try to paint warm shadows, but that is rare for me.
Clean up your edges, and put in the highlights
Towards the end I like to clean up or sharpen a lot of the edges, leaving some soft mind you, using dark paint followed up with light paint. And of course I like to work from general to specific. Starting with the biggest brush you think you can handle, and then grabbing the next one bigger to start with, and use smaller brushes as you absolutely need them.
Stick a tooth pick in it, your done
A question I get a lot is, “How do you know when you are done?” That is a good question, you can noodle a painting to death if you are not careful. Robert Barrett, one of my instructors in college used to say, “It is done when you are out of time. Bring the whole painting together at once, rather than finish one area and move to the next, so when you are out of time the painting looks consistent throughout and you can hand it in.” Wayne Andreason says, “It is done about 50 brush strokes before you ruin it.” I say, It’s done when you stick a toothpick in it and it comes out clean.
Artist stresses over painting in hidden mirror
You can watch me stressing over it in time-lapsed mode if you notice the little mirror on the left. Did you be sure and watch the end? I was so proud of that little wink. Sorry if it seemed cheesy.
Where can you learn more?
For more in depth acrylic lessons, feel free to purchase Acrylic Painting at FolioAcademy taught by me, Will Terry, or one of the others on our acrylic page or one that I like a lot is one by Greg Newbold, called Conquer Your Acrylic Demons.