How to: Painting with Acrylics Video Course

Learn How to start Painting with Acrylics, using my Dry Brush Technique

acrylic painting painted with the Will Terry dry brush technique

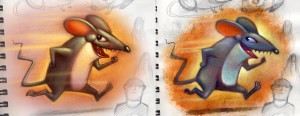
There are many ways to create a painting with acrylics. The way that I do that is, I use a technique called a dry brush technique. I paint with a very dry paint brush with acrylic paint. Little by little, I build up layers of acrylic paint on a textured surface, to create my Acrylic Paint look.


It is so hard to explain my Acrylic Painting  Drybrush style without video.

close up, Acrylic painting

I’m still amazed at how amazing the internet is – I almost think that it’s a blessing to have grown up without it. I don’t think my kids can appreciate it as much as I do.
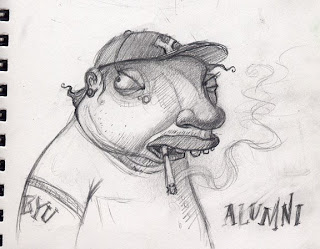
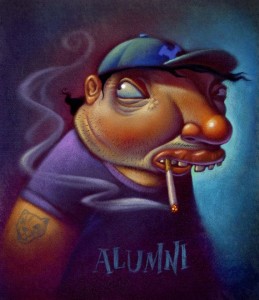
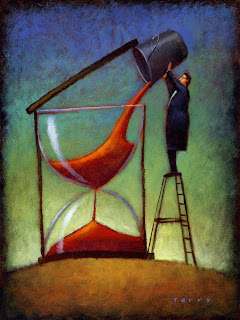
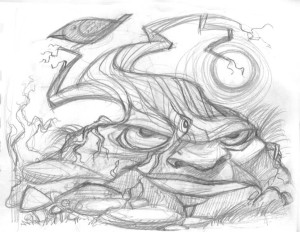
The internet has made it possible for illustrators and artists to show and teach our students our techniques. Instead of the frustrations of trying to explain how to dry brush, I can now show it. In the how to paint videos I take the painting you see above from start to finish in real time. I didn’t speed this one up so anyone viewing it can see exactly how you can dry brush with acrylic paint. I start it with a sketch, transfer to paper, add acrylic texture, under-painting (or Grisaille), and finally the finished painting using wet paint, glazes, and dry brushing. I talk about everything from materials to design.

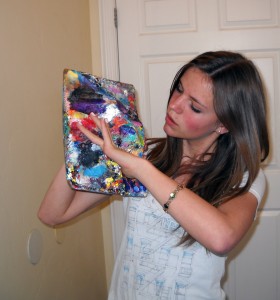
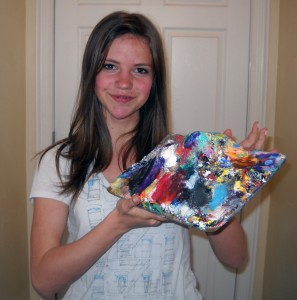
Acrylic Paint won’t do what it won’t do

Pencil sketch to be produced as an acrylic painting

I often hear my students complain about how much they HATE painting with acrylics– I tell them, “It’s because you want them to do something that they aren’t good for.” In these videos I show you why acrylics have been the workhorse medium for illustrators world wide.

Bonus Videos

Acrylic painting dry brush technique picture

I also included two bonus videos – two different approaches on how to paint using acrylics: Painterly and cross hatching. I really hope these videos are helpful to anyone trying to learn how to paint with acrylics! Click here for more information


And of course, see Folio Academy for all your art lessons on line.


Digital Art work vs Traditional Acrylic Painting

Can you tell which is digital art and which one is Acrylic paint?

Digital Art work of a speeding rat vs a Traditional acrylic painting of the same rat


Digital Art work on the Left vs an Acrylic Illustration on the Right

Pretty cool huh? Check out the texture on the Digital Art (left).

This little mouse, or rat, (depending on what YOU want it to be, (I want it to be a mouse, with teeth) was just a little doodle in my sketchbook that I ended up painting in Photoshop a while back. I posted it just a week or so ago talking about how you may want to make the switch. I also painted it the old fashioned way for an art demonstration for my Media and Techniques class at UVU. I used my dry brush, technique using acrylic paints. I just thought it would be kind of neat to do a side by side comparison.

I paint so dry that I just lightly put some Liquitex heavy gel medium down right in my sketchbook and painted him there. I used to like having a few paintings in my sketchbook – That way I always had a few finished pieces with me wherever I would go. Now of course I carry my i-pad and always doodle, digitally of course, and have a regular portfolio with me all the time. It sucks when you lose it at the airport though. Yes that happened, well almost happened. I went back to where I was sitting and an hour later, it was still there. I am a grateful man.

It is starting to look like I like to paint digitally. I have a secret. I have converted. But don’t get me wrong, I still love a real painting,and if I were to do gallery work, it would be a must. I just really like the switch that I’ve made.

You can learn how to paint digitally at FolioAcademy.com and you can learn my dry brush acrylic technique there too.

Mountains of Paint on a Pallet – Years of Buildup a Work of Art

Mountains of Paint: Artist’s Paint Pallet, a Work of Art

I seldom use my pallet or acrylic paints any more

palette (5)

Since I went mostly digital, I hardly ever use my brushes, my paper towels or even my beloved pallet. Beloved you say? Well, my pallet is like an abstract painting that is 20 years in the making. I still love painting in acrylic, it’s just that digital painting is so much easier and faster now. There is something to be said for traditional painting. The smell of oil, the finished work, paint on canvas is so timeless and original.
So I’m feeling bad because I just don’t add to this creation any more.
What started out as an insignificant piece of Masonite that I pulled out of the trash,
turned into this big thick clump of endless layers of acrylic paint.
layers of paint since 1990 
a painter's pallet, years of acrylic paint build up. Makes for a 3-D piece.So I was looking for something I could blog about and then it occurred to me – my pallet! This mound you see before you is constructed out of all of the acrylic paint I’ve used since 1990! It started out as my friend Wayne’s Masonite oil pallet. Wayne thought his pallet was too big so he cut it in half and tossed my half (the piece you see) in the trash. Way back then it was just a flat piece of 1/4 inch board. When I pulled it out of the trash and started using it as my acrylic pallet it began to grow.


Don’t Throw it Away! It’s got Character.

palette (9)


There was a time when I was going to discard it – it was growing out of control and I thought it would be easier to work on a new one. In fact I did carve some off a few times. But then I looked at it again – all bumpy, colorful and lumpy, Full of character and personality, We’d been through a lot together. “There there lil’ fella, don’t you worry – daddy isn’t going to abandon you like Wayne did.” (can you tell it’s 2:00 AM?)


He’s been around too

palette (10)So here he is – I figure he’s probably middle aged like me – lots of miles, like me and many more ahead, like me, (I hope). He’s been to Maryland, California, technically Nevada and Idaho, but mostly he’s lived here in Utah. Of the thousands of paintings I’ve done he’s got parts of all of them in him.
 I think I’ll name him Benjamin since I never had any run-ins with anyone named Benjamin.

There is an arch in there

palette (6)Oh, and that arch you see was at the request of my children constantly nagging me to sculpt some form into him – It took about 9 months to build the arch. Sometimes you just gotta ask yourself, “What would Dr. Seuss do?” I think his pallet would look a lot like Benjamin.

Illustration Demo for BYU Art Students

Art Demonstration for an illustration Class at BYU

 I may offend them with a BYU alumni overweight, and smoking!

I was asked by Greg Newbold to do a demo in his illustration classes… so I racked my brain to come up with something that would be FUN but non-offensive to the students. Well not TOO offensive.

Behold! the sketch I came up with. Fun? Offensive? Art?

I really like this sketch and I’m going to paint it but I’m concerned that the student’s might not like that I’ve decided to portray a BYU alumni overweight. And as many of you know, they don’t smoke, so I am taking a little risk here. Not to worry, they may be Mormons but they aren’t that uptight.  :)

Finished, Acrylic paint over Photoshop printed background.

Six hours to paint it

BYU alumnusThis is the finish art demo: It was a lot of fun working on it and talking to students. I was happy that they thought it was funny… or at least, didn’t beat me up for poking fun. I worked on it in class for about 4 hours and spent an additional 2 at home with a few finishing touches.


Digital Stage, no lighter than 50% value.

This is the beginnings of my digital stage where I Scan in my sketch, take that into Photoshop and airbrush some smooth, basic colors and keep them kind of dark. My main concern is getting everything no lighter than about 50% value.

Using Photoshop I spent about 20 minutes laying in shadows and basic foundation colors. Then I printed it on watercolor paper. The next step in this method was to stipple a layer of acrylic gel medium over the print. I use a kind of short hair paint brush and a little Gel Medium at a time and stipple it onto the paper, giving it millions of little tiny peaks. Aka tooth. The gel drys clear so you can paint with acrylics right over it. Building up the lighter areas. And of course saving the highlights for last.


Cover Art for Storywoks Magazine

Art (slash) Illustration for a Magazine Cover

Magic carpet ride over bookish buildings

magic carpet

Kids having fun with a reading theme

I was excited to take this job. I was happy to draw and illustrate this fun assignment: “Kids having fun with a reading theme”. It was a lot of fun to come up with the whimsical idea of a kid all freaking out on this wild magic carpet ride while his dog is hanging on like a pit bull and he little sister, or brother, not at all afraid of the potential danger all around, just curled up with a good book and having a great time.

My transition to digital phase

This was done during my “transition to digital” phase. I started my transition by saving time just going into Photoshop to crank out a quick back ground. Just spray in a gradient and print it out on good paper and vuala! Most of the boring part done. So this piece was a little painful because I produced it 100% in acrylics. Not because the client wanted it in acrylics. Not because I had more time to kill, but because my printer has finally given up trying to please me. We are no longer friends and I have banished it to the garage….And then we moved, and I hope that hateful printer is still in that garage thinking it will still have a life someday, and wondering why I haven’t come and apologized and plugged him back in. Sense any hostility?

100% ACRYLIC PAINTING ON PAPER, THE OLD FASHIONED WAY.

So it was back to my old fashioned way of painting with acrylics. Tone the paper and painstakingly dry brush a gradient back ground and then finally get to the painting. Eventually, even that became too painstaking for me, and I have pretty well converted to 100% digi. (That is short for digital, I think) Ho the dread learning curve. Now I’m happy I made the switch. lol :)

Editorial Illustration: Time

So I Illustrated the word: Time

I’m pulling this from the dark corners of my archive

Back when I did a lot of editorial work I created this. It reared its acrylic head again a few years back when I pulled it out of the flat file and entered it in an Illustration Friday deal for the word time. And now it shows up one more TIME.

Just wanted to post something a little different. It’s about time, don’t ya think?  : )

Phases of this Textbook Cover Illustration

My Art Process for the Phases of this Cover Illustration

The Sketch

Element hired me to do the cover art for an English language text book.

– the idea is that by learning English you become more free to pursue whatever you want.
– that more doors are open to those who speak and understand English. And probable to those who know how to read and write English as well.
My client wanted me to illustrate some of the buildings in the shape of letters to further the language angle.

SEPARATE BACKGROUND Can be Used Multiple Times

I was asked to paint the background separate from the foreground so they can use it for other covers that we are currently working on.

Adding ELEMENTS

This is a challenge because as I’m painting it’s hard to control values and colors but here they are combined.

Final Cover Art

This is the final illustration, by me, Will Terry, with the cover graphics. Turned out pretty well.

Illustration Shortcut: Acrylic on Inkjet

“I cut my painting time in half by starting in Photoshop”

Will Terry of Folioacademy used a shortcut to create this illustration for a greeting card for PK Press. He Painted, or blocked in the base in Photoshop, printed it on watercolor paper, then finished it with his famous acrylic, dry-brush technique. He is always looking for ways to maximize his efforts. Deadlines are ever present for the professional illustrator, and when you can figure out a way to speed things up, you’re onto something.

What used to take forever can be done in less than half the time.

It took so much longer with the old dry brush technique, laying in the background and basic shapes, can be done in less than half the time using the right tools. Embrace technology, it’s not going away.

pic of finished piece: Blwfish

“I was able to cut my painting time in half by blocking in the foundation in Photoshop.” ~Will Terry

Photoshoped in some spray paint and printed on Watercolor paper.

He used to start his paintings on paper, transfer it to paper, and paint the whole thing with his paint and brushes.
Awhile ago he took a leap of faith and tried something new. This became the phase where he would start in Photoshop and finish with acrylics. “I scan my sketch and paint flat color on it in Photoshop, Then print it on watercolor paper, add texture gel and paint acrylics on top.” He now paints most everything digitally from start to finish but this was a crucial step in that direction, you may want to try it.